Standardisation, achieved through tolerances is long standing, but essential for global trade
The concept of component interchangeability and dimensional tolerancing are an accepted part of modern manufacturing. The value of producing ‘identical’ parts that fit into any assembly of the same type has been around since 1841, and probably earlier. Sir Joseph Whitworth developed the British Standard Whitworth (BSW) thread form, which forever improved distributed manufacturing. It enabled both competition and co-operation between differing manufacturing companies.

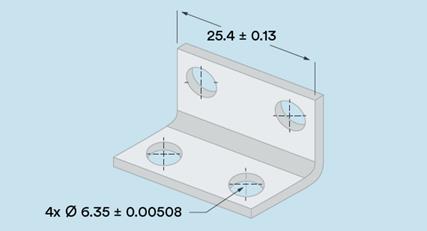
At Protolabs, our standard prototype and production machining tolerance is +/- 0.005 in. (0.13mm). But if you need greater accuracy, there's our standard precision or production machining tolerance of +/-0.002 in. (0.051 mm). We're also able to hold +/- 0.0002 in. (0.00508mm) on reamed holes, and +/- 0.002 (0.051mm) on feature locations, provided those features are machined on the same side of the part.
Perfection can hinder progress
It is easy to add tight tolerances and over constrain with Geometric Dimensioning and Tolerancing (GD&T) at the design and prototype stage. This will inevitably drive up manufacturing cost and limit sourcing options further along the development cycle. The most stringent tolerances may require secondary machining steps like grinding, polishing or Electro Discharge Machining (EDM) increasing both costs and more importantly lead-time.
Likewise, tolerances that are too loose can make assembling parts difficult or impossible.
To help navigate the types of tolerance and likely cost implications, this article covers tolerances available from Protolabs, along with commonly used tolerances. Finally, we will explore Geometric Dimensioning and Tolerancing (GD&T), defined under BS 8888:2020, ISO and ASME.
Standardised tolerances for CNC machining
Many suppliers insist on a 2D drawing. Sometimes this is so they can charge extra for the tightest tolerances, and save by producing the rest of the component to a slacker General Tolerance (GT). Protolabs manufactures everything to a moderate standard tolerance of ±0.1 mm. keeping it simple saves time producing drawings and communicating. For the majority of components it is enough: 54% of functional components can be manufactured to a tolerance of ±0.1 mm or less.-Protolabs research

Fine-tuning tolerance dimensions in your designs for CNC machined parts can help maximize those parts’ quality and reduce cost.
Tolerancing guidelines for CNC machining
Over constraining a design can take two forms: either adding an unnecessarily tight tolerance, or constraining in each degree of freedom more than once – a single pin will constrain in x and y, a second pin will prevent rotation. The same applies for slots and inserts – over-constraining will add cost.
Surface finish
Typically, Protolabs offers a surface finish of 1.6 µm Ra (Roughness average) across the range of CNC materials. Ra 6.3 µm to Ra 0.8 µm are typical for general CNC machining. Optional bead blasting will result in a slightly rougher, but uniform, matt finish. See the surface finish guide for detailed images.
Designing in adjustment
Adding adjustment to a design can be a good way to get an accurate fit, and hedge your design bets, or test for the tolerance you may need:
- Shimming: (using a thin piece of material to adjust the height or gaps) using shim steel or shim washers.
- Adjustment screws: grub screws, or fine pitch screws can be used to alter position or push an assembly against a datum – don’t forget to consider how to lock the position (nylock nut, thread locking compound or another screw)
- Press-fitting: pressing 2 components to a known height or position
- Shrink fitting: by heating one component, thermal expansion can be used to lock two components accurately
All of these methods are great for jigs, test rigs and assembly equipment.
Modification during assembly
Bench fitting, fettling and polishing are all processes you definitely want to avoid if your product is destined for high volume manufacture. They are highly dependent on skill, and introduce variation. However, in the test and prototype phase using fine emery, lapping paste or polishing compound and a quick way to measure, can be a quick way to iterate your design to the necessary tolerance. Another tip is to produce multiple designs for assembly testing; CNC and 3DP can quickly produce a test array.
What are microns?
The micrometre (µm) is tiny at 100th of a millimetre; this is barely a “smell”: quite literally, a particle of cigarette smoke is 1 µm in diameter. When holding your mobile, the warmth of your hand will change its size by up to 68 µm. Which puts our general tolerance of ±100 µm into context – avoid measuring in microns, unless you are planning to normalise for 24 hours and measure in a temperature-controlled environment using a CMM (which Protolabs offers).
(# aluminium alloy CTE = 24 µm/m/°C, ambient 18 °C, body temp 37 °C, phone length 150 mm)
Quality control and documentation
Upon request, we’ll measure using CMMs (coordinate measuring machines), laser scanning or other metrology equipment. We will also work with you on the Production Part Approval Process (PPAP), provide a Certificate of Conformance (CoC) to your specifications, and provide First Article Inspections (FAIs), and material data sheets.
Capability and measurement accuracy
“Although Protolabs quoted ±0.1 mm on the aluminium parts we received all of the dimensions were within ±0.05 mm” – customer comment.
Protolabs uses capability studies to maintain tolerance, which means we often exceed the quoted tolerance, as it needs to cover multiple machining setups and material types. To get the best tolerance, use the following guidance:
- Where possible, orientate all the inter-related features to be machined in one plane (so they get manufactured in the same setup)
- Use materials with a low thermal expansion (Coefficent of Thermal Expansion CTE)
- Use plastics with good hygroscopic properties: water absorption will change the size and shape, this will effect CNC cut glass filled plastics
Geometric Dimensioning and Tolerancing
GD&T provides a more detailed narrative that the designer can use to explain the important manufacturing considerations to the manufacturer. A little like a shorthand – often by adding a GD&T you are requesting a specific sequence of manufacture, and possibly a different manufacturing process. As this includes the fit relationships between various part features, it also demands more quality control, measurement and gauging.
Limits and fits: Normally defined on a hole basis (to ISO 286-2) this uses a letter and number (along with the overall hole diameter). Holes are defined with a capital letter H7, shafts with a lower case g6. The bigger the number the wider the tolerance band:
- 9 and above is a typical mill or drill tolerance,
- 7 generally means a reamed hole: a specific reaming tool is needed for each hole size
- 6 and below needing even more specialist machining.
The letter defines how far from nominal (H is on nominal, k and greater are larger than nominal (interference fit) g and lower are smaller than nominal (clearance fit).
GD&T:
A good course will explain both how to use and measure each tolerance class (there are plenty to choose from, Mitutoyo, ImechE or NPL). How are Geometric Dimensions & Tolerances manufactured?
True position: Most commonly used with a diameter symbol to show the tolerance applied in every direction. Note it is absolute, so 0.030 means ±0.015. Reamed holes are almost always needed, as if the hole diameter is irregular it will eat into the GD&T. Calibrated CNC equipment and meticulous measure-setups are required.
Flatness: Milled surfaces are generally quite flat. Adding a very tight flatness is normally code for surface grinding. Adding parallelism means two faces must both be flat to each other. Surface finish is often also added (as it will eat into the measurement tolerance). Tip: slightly raised pads or marking the drawing to show only the areas where flatness is critical can simplify manufacture and measurement.
Cylindricity, concentricity and run-out: applies to holes and shafts, run-out is most often specified as it is easier to measure: a ‘clock’ or DTI (Dial Test Indicator gauge) measures deviation as the work piece is turned. It is a compound measurement so further measurement may be required to work out if it is cylindrical (not egg-shaped) or concentric (off the centre of rotation).
Squareness (perpendicularity and angularity): CNC milling machines are calibrated to check the tools are square to the machining bed, this delivers good squareness, especially over short distances. The tighter the squareness tolerances the more iterative and time consuming the manufacturing will be.

At Protolabs, we offer both a fully automated machining option for fast turnaround or a high-precision option with extended milling and post-machining capabilities for the highest complexity parts. Whether machining prototype or production parts, we have all of your CNC milling and turning needs covered.
Summary, it is important to know about tolerances, GD&T and use them appropriately. It is easy to add them to a drawing, but always think whether they are needed, as it could be difficult for your manufacturing supplier and they will charge you accordingly. Remember, we can quote and manufacture quickly directly from your CAD model, and there is nothing better than a physical part when it comes to working out how a design will fit together.
We are here to support your project. Just give us a call or send an email if you want to know more. We always have applications engineers available to assist with any questions at customerservice@protolabs.co.uk or +44 (0) 1952 683047. Ready to start your next project? Just upload a CAD file to our website.